Wednesday, July 27, 2011

~*Work, Behind.....Work, Behind*~

Do you ever get that feeling that you're like a hamster on its wheel running and running and staying in the same place no matter how fast you go?
Right now that's the way I feel!! The heat has finally settled thankfully...so draining! But I am so drained by ALL the tasks I have at hand that I keep going back & forth on.
Bedroom redo....still in progress
Organizing-sorting craft supplies....still in progress
Getting my patterns ready for sale....still in progress
Odds & ends(shelves with one coat of paint, pillows that need stuffed & finished, samplers that need framed etc. etc.)....still in progress
HOUSECLEANING.....sorry to say my floor has not been mopped in over a week now and my can of pledge has been waiting for longer than that.
Do any of you hit this point??
I look at all of your wonderful blogs and think I am the only one. I tease about having ADHD but I honestly think I do. My brain never shuts off and my hands can never be idle...which would be fine if I didn't feel as if I was running in 10 different directions!!
Sooooo.....my question is am I alone here??
I could really use some feedback to let me know that I'm not the only one that gets in over my head with great intentions & too little time!
Help me girls!!
Okay...I'm off to start a new project...no just kidding...or am I???
Blessings from your ADHD poster child blogger  ~Kriss~


Tuesday, July 26, 2011

~*Gable House Musings Giveaway*~

Misi at 1890 Gable House Musings is having a wonderful giveaway! You won't want to miss taking a chance on this one...Mary's dolls are wonderful! Here is the info as she had it posted on her blog...good luck!!

To enter the Giveaway
You must be a follower of my selling Blog

http://gablehousegoodes.blogspot.com/


You must comment on this post
& Then send Mary an email- Welcoming her to Gable House Goodes

Mary.prairiehomeplace@gmail.com

OR you can advertise this Giveaway on your blog sidebar

For an extra chance in the drawing - You can register a purchase- when you purchase from Gable House Goods make note in the payment for a second entry in the giveaway.

The drawing will be held Friday August 26th

Sunday, July 24, 2011

~*Giveaway from Brenda of Rusty Thimble*~


Brenda from the Rusty Thimble is having a great giveaway on her blog. You have many chances to win & get to pick from 5 things!! It would be hard to pick as everything is so wonderful!! Be sure to check it out and let her know that I sent ya!!  ~Kriss~


Wednesday, July 20, 2011

~* Free Halloween Cross Stitch Pattern Giveaway*~

Happy Wednesday....maybe a bit of a break from the heat here today.
Hope you have all enjoyed the tutorial & pattern from Mary & myself. I'm going to be doing a giveaway with a bit of a twist to follow up on our cross stitching journey.
I will be giving one of my Halloween cross stitch patterns to the first person that completes & posts (be sure to let me know!!) a picture of one of the finished designs that Mary and I each offered for free with our tutorial. There will be two winners...one for my design and one for Mary's. The only other rule for the giveaway is that you must be a follower for both Mary & myself.
Pretty simple!!
I'll be posting a picture of the design you will receive tomorrow. I'm still working with converting my designs to PDF files so you will hopefully have the choice of either receiving it as an e-pattern or a mailed hard copy.
There's no deadline for this giveaway...whoever gets it stitched and posted first will be the winner. You have to make sure you let me though as soon as you post it.
I had a huge problem with putting my email on here & received a ton of spam and actually think that I got the huge virus that messed up my computer from it so here's my email a bit broken up....just put it all together :o)
kp primitives @ hotmail dot com
Hoping that many of you are stitching whether a long time or new stitcher.
Looking forward to seeing some of those finished pieces!! 
~Kriss~

Tuesday, July 19, 2011

~*Swap From Samplermakers*~

Good morning, is everyone sweltering in this heat??
Whew...when you just sit and sweat it's hot...I personally like to have to work for my sweat and usually opt not too  :o)  Maybe I'll shed a couple of pounds?? Okay, wishful thinking there!
Want to share some wonderful items I got in a swap I participated in thru a group I belong to run by Lori of Notforgotten Farms called Samplermakers. My swap partner is a sweetheart named Wanda and she totally hit the mark with all my goodes!!
Check out her blog at http://www.oldecrowmercantile.blogspot.com/ 
 You'll be glad you stopped by for a visit!!
Here are some pictures of the things she sent
It all came in this cute little bag too!! A great pattern by Stacey Nash, the fabric (linen...oh my!! I always stitch on osnaburg because it's less expensive...this linen will be a treat!!), floss needed, fabric for finishing the drum pinkeep, a stitching magnifier and the CUTEST little scissors I have ever seen!!
Here's a better picture of the bag. It's a perfect size to store stitching supplies!
Are these not the CUTEST scissors you have ever seen?? She even has dark hair like me! Needless to say when I was stitching last night she was right there to snip my threads!!  Love her!
THANK YOU Wanda for such wonderful things!! It was a pleasure & I hope you'll enjoy what I sent to you also!! I actually designed a new pattern for a Notions box, pinkeep & pincushion that I packed all her goodes in but I won't post a sneak peak for the pattern until she receives her package!

In a final note my mornings on here are usually shared with my little parakeet Teeka...remember him? He was my mothers day gift from my oldest son this year. We have our mommy/bird time in the mornings after my husband is gone because he's afraid of birds...wanna see a grown man scream like a girl...get the bird out and let him fly a little! Maybe I should as a threat to get those dirty boxers in the hamper and not on the floor...hmmmm....
My dog Dakota has found Teeka to be quite fascinating now and I let them have a moment...pictures a little blurry but still sweet. Teeka is molting right now so excuse his hairdo....
Have a great day and don't forget to check the cross stitching tutorial & free cross stitch patterns from me and Mary of Gettysburg Homestead .

~Kriss~

Sunday, July 17, 2011

~*Cross Stitch Tutorial & Free Sampler Pattern*~

Welcome to the wonderful world of cross stitch!!
This tutorial is to help any of you that have ever wanted to stitch but has never had the opportunity to be shown how.
Mary at Gettysburg Homestead is responsible for bringing you this tutorial. She's a lefty and I'm a righty so she asked if I could help all you other right handers out there.Click on her name and it will take you to her blog.
She has a previous post for all the basic information you will need and did a wonderful job breaking it all down. Now I'll add my own spin to it.
***Have to tell you I had MANY problems loading my pictures so you might have to go back and forth a little but they should still make sense to you.***

Let's get started!!
First you will need your basic supplies. Cross stitching is fairly inexpensive depending on the supplies you use. Below is a list of what you will need to begin.
1.Fabric
There are many types to choose from with linen being the most expensive to osnaburg being the most economical. The most common are:

Aida Cloth~ This comes in different "counts" with the higher the count the smaller the weave and the smaller your stitches will be. This is my least favorite fabric to stitch on as I feel it doesn't have the "old" look that we all love in our finished designs. It is however probably the easiest to use if you are a beginner stitcher. Consider using this to help you get a feel for counting your stitches and then play with other fabrics once you are more comfortable.

Linen~Linen is the most expensive but the most beautiful and authentic looking fabric to stitch on when working an old looking sampler or design. It comes in various shades.

Osnaburg~ This is my number one choice to stitch on. This has close to the same look and feel of linen and stains up beautifully. It's also very inexpensive at under $4.00 a yard.

I personally don't prewash my fabric before stitching.Some people have mentioned having problems with shrinking when they stain their piece but I always use fabric at least 4" larger than my finished design area and have never had a problem. It is completely up to you. If you do wash it don't use any fabric softener...it could affect you staining process.

2. Floss~ There are a few different types of floss. I can only tell you about DMC floss as that's all I've ever used. It's readily available at most craft/fabric stores. Each pack of floss is called a skein.

3.Hoop~
You can choose plastic or wood. I use plastic as I feel it keeps my fabric tighter during stitching. They come in many different sizes. If you buy just one hoop I would recommend an 8" or 10". This will give you plenty of stitching area to see alot of the design you are working.

4.Scissors & Needle~
Any sharp scissors will do but if you plan on doing a lot of needle work I would suggest buying a pair of embroidery scissors. They're small and easy to pack with your supplies and are nice & sharp. I have had mine for years and they're still like new.
Your needle should be nice and sharp. Stay away from the blunt end styles as they can be hard to pull thru your fabric and are usually thick.

5. Pattern~
There are so many to choose from that you could stitch one a day and never run out! Though my own personal taste I enjoy patterns by Notforgotten Farm, The Goode Huswife, Stacey Nash,Country Rustic Primitives,Pineberry Lane and Primitive Bettys to name a few. Remember to check the patterns by Mary and myself too!! I'll be listing mine on here and Patternmart in the near future!!


Now it's time to start stitching!!

The first thing you need to do is find the center of your pattern design and the center of your fabric.
Most patterns have the center marked with arrows on the top and sides that you follow together to reach the center. If not marked simply count the rows from top to bottom and side to side and mark where they meet. I usually lightly mark this spot with pencil.
There may not be a stitch right in this spot, if not you will just count over and start at the closest stitch to the center for your starting point.

To find the center of your fabric fold it in 1/2 and press the fold with your fingers to make a crease then fold in 1/2 again. Press the point where the fabric folds meets in the center with your fingers to make a crease. Carefully unfold and you will see the center, this is where you will begin your stitches.


Thread your needle referring to your pattern for how many threads and what color to use.

**You will make your first stitch without your fabric being in your hoop**

Each stitch is done in a "square". There will be 4 holes you will work that will form a "box". Top left, top right, bottom left and bottom right with one thread in between.

Bring your needle thru the top left hole of your "square" from underneath your fabric. Pull thru leaving a 1-2" "tail" of thread hanging free. You will not make a knot in your thread to hold it but catch this tail under other stitches to hold in place.


Now bring your needle thru the bottom right hole from the front. You will count over two threads from where you came out and down two threads from there...this is your bottom right hole. Be sure to hold your tail underneath and pull your thread thru gently on top so you don't pull out your first stitch.


Now bring your needle out thru the bottom left hole, this will be two threads over to the left from where you just went in at the right. As you pull this stitch thru check underneath and catch your "tail" under this thread.

Now put your needle in the top right hole, this will be two threads over from where you started initally. Pull thru....you should now have an "X".

Now it's time to put your fabric into your hoop. Your hoop will have a This Side Up mark. Open your hoop by twisting the screw at the top. You don't need to take it all the way off but loosen it enough so that it comes apart and your fabric will fit when you lay the top part of the hoop over it.

Lay your fabric on the top of the hoop with the lip on top (this will hold the fabric in place when you tighten the hoop) center your started stitch being sure that your X is facing the right way that you stitched it and puddle your thread underneath so it doesn't get caught. Put your needle in the fabric from underneath a little to keep it in place.

Now lay the other part of the hoop with the screw on top and push down to fit together. The little lip will come up and over a bit. Adjust the opening as needed. Once together begin tightening the hoop and pulling your fabric taut all the way around as you go. Tighten it all the way. You want the part with the screw at the top to be centered over your design. You want a nice flat, taut surface to stitch on. Make sure you don't catch the thread underneath between the hoop & fabric.

You are now ready to begin your design!!
Carefully look at your pattern to see where the next stitch will go. Be sure to catch the "tail" from your thread under a few more stitches to secure and then snip it off close to the stitches underneath.


I usually work from right to left to start. Just try to keep your stitches all going in the same direction with your last stitch going from top right to bottom left. This will make your design look neater than a bunch of stitches going all different directions.

When your thread gets 2-3 inches long you will need to start on another strand...or if it is time to change color. To end your thread do not knot it simply put your needle under a few stitches underneath and pull thru. Snip off close to the stitches, this will keep it secure.

**I cannot stress enough how important it is to count, count, count, your stitches as you go! Double check your pattern & stitches. There is nothing worse than having to pull stiches out after a lot of work is done because you are one stitch off! It happens to the best of us but the more careful you are the better.**

~Finishing Your Work~

You can either keep your finished piece as is or you can age it to make it look old by staining it.

I prefer to use a coffee stain on my pieces and place them in a distressed frame. Below are directions for each process.

Staining & Aging:
My chosen method for staining is a coffee based stain. Use 2-3 tablespoons of instant coffee and 1 tablespoon of vanilla for each cup of hot water. I like to soak my pieces in hot staining solution as I feel it stains quicker and gives a deeper color. Check your piece every 5 minutes os so until it reaches your desired level of darkness.
Remove from stain with a slotted spoon or tongs and squeeze out when cool.
Smooth out on a towel to air dry. You may also dry in the sun or in your oven on a towel lined cookie sheet set on the lowest temperature. Be sure to check every few minutes so you don't burn it. Drying in the oven can leave marks on your fabric so watch closely. I truly prefer air drying.

Framing:
You will need a wooden frame to fit your work, black acrylic craft paint, Folkart Antiquing Medium#811, disposable sponge brush, soft rag, sandpaper and adhesive craft spray.
Take your frame apart and paint  with 2 coats black paint. Once dry sand lightly to remove some of the paint paying attention to where normal wear would occur...corners, edges etc.
Remove sanding dust and lightly paint on antiquing medium wiping off as you go. This will stain the wood exposed underneath from sanding and give it a nice finish. Let dry.
Iron your stained sampler and center the glass from the frame on top of the design. Trace around the edge with pencil and cut out.
Spray the cardboard backing of your frame with the adhesive spray and lay your design on top smoothing it out.
Place the glass back in the frame, put your design in and secure the back.
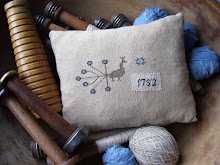
I cannot get the file to print out the DMC colors for you so let me explain what to use:

The flowers are 3858
The stems are 3051
The basket is 3781
The name, age & date are 3021
The little motifs are 869

You will use one strand of floss over two threads...just like I explained in the tutorial.


There you go!! I really hope this has been helpful to you. It was challenging to try and explain in words and pictures. If you have any questions you can contact either myself or Mary...we would be more than happy to help!!
Cross stitching to me is a relaxing and rewarding experience. I love to design and stitch, there's nothing else quite like it to me!!

Happy stitching my friends!!


A BIG thanks to Mary for trying to help me figure out all of the computer issues...it was so nice talking to you on the phone!! My phone never did get charged up enough to use!
 ~Kriss~

~*Cross Stitch Tutorial Reminder*~

Just a quick reminder that Mary of Gettysburg Homestead and I will be posting the tutorials on how to cross stitch tomorrow. I'll be the righty guide and she'll be the lefty. You will be getting a free pattern from each of us too to help get you started.

I also won her giveaway for the pattern & supplies for one of her sampler designs!! I was shocked....I usually never win anything! Thanks Mary...it's been fun over the past weeks getting to know you more and letting you laugh at all of my blonde moments!! Her designs are really wonderful and I know that you'll love the free one she'll be giving you!!

Happy Sunday to All   ~Kriss~

Friday, July 15, 2011

~*Happy 20th Birthday Joshua*~

My "baby" boy is 20 today!! I can't believe it....honestly...didn't I just bring him home yesterday??
Joshua was truly a gift, many years of infertility treatments and month after month of disappointment as I just couldn't seem to get pregnant.
I will never forget the day that I found out that we we're going to have him, my heart had never felt so full. I can honestly say that I don't think my feet ever touched the ground his entire first year of life....every day was a gift.
I am so proud and so blessed to be his mother...from my little toe headed blonde boy with big brown eyes to the fine tall, dark & handsome young man he has become today.
As mother's all we want is for our children to be happy and healthy, to give them the roots to grow.
I watch him on his journey into adulthood now, trying to figure it all out...who he wants to be, where his passion lies. A whole world to make choices from. He's still searching his heart for all of the answers...making his own celebrations and yes, his own mistakes.
Sometimes I look at him or hear that deep voice call my name and I don't see my 6'2 son but the little boy who used to spend hours just lining up his hot wheels cars asking me for a box of raisins...my little man.
He may not need me to hold his hand to cross the street anymore but I will always be there to hold his heart when needed....a mother's love is never a question.
Happy Birthday Joshua....and blessings to me for having the chance to have you in my life.
~*Mom*~

Thursday, July 14, 2011

~* Advance Information For Free Sampler Pattern & Tutorial *~

Good morning blogger friends. It's another beautiful day here....sunny, warm & a perfect breeze. After the spring we had this weather is most deserving!!
As you know from former posts I am working on a cross stitching tutorial with Mary from Gettysburg Homestead. Trying to get it all done to post be Saturday at the latest.
Wanted to give you the information on the supplies you will need to stitch my little sampler so you can have it on hand when you download the pattern & can start stitching right away....if you're like me you lack patience & I hate it when I don't have everything I need when I get a pattern!!
You will need the basics:
1. Embroidery Hoop - If you are going to purchase one for the first time I would suggest an 8" or 10"
2. Embroidery Needle - make sure it has a nice sharp end, you don't want the thick blunt tip ones
Your other supplies :
1. DMC floss in 3858, 3781,3051,3021,869  (one skein each)
2. Osnaburg Fabric - You can buy this at your local fabric/craft stores
    It's very inexpensive at under $3.00 a yard, you will only need a small piece so 1/4 yard will be plenty.
   ** If you've never stitched before you might want to pick up some Aiada Cloth (also available at craft/fabric stores ) The higher the count the smaller the stitches. You can decide what you want to start with to make it easiest to see and work your stitches . You might want to stitch on this first to familiarize yourself with cross stitch and then move on to the osnaburg which has a linen look to it but is a little harder to stitch on.**
Finishing Supplies:
1. 5x7 frame (thrift store and cheap Walmart ones are best!!)
   Get a natural colored one as you will be painting it....no plastic or colored ones.
2. Black craft paint
3. Folkart Antiquing Medium 811
4. Disposable sponge brush or medium craft paint brush
5. Medium grit sandpaper
6. Spray adhesive
7. Cheap instant coffee & cheap vanilla

  Looking forward to getting you all started and sharing a pattern with those of you who already stitch!! Be sure to give a big Thank You to Mary for putting this together for...her heart is the sweetest!!
                                              ~Kriss~   

Wednesday, July 13, 2011

~* Happy 50th Birthday Michael!! *~

My husband is 50 today!!! I can't believe it, there's no way that 28 years have passed since we've met! We've shared so many things together in that time, I feel like I "grew up" with him although he is 6 years older than me and I like reminding him of that LOL!! Pretty funny, he got something from AARP in the mail last week. Dinner on the grill for him tonight and off to get an ice cream cone later...he's an ice cream addict.

I'm surprising him at work later today with some homemade cupcakes. With black cupcake liners & black sprinkles of course!!

** Happy Birthday Baby!! **

Have another full day finishing up all my goodes...made a lot of headway yesterday. Really happy with the way everything is coming together and I designed a cute little sampler that you'll be getting the chart for free on here when Mary and I post the tutorials on cross stitch.
Hope you all have a blessed day  ~Kriss~

Monday, July 11, 2011

~*Why Do I Not Receive Posts From All Blogs I Follow??*~

Good Monday morning!! Hope you all had a nice weekend.
Wondering if any of you can tell me why I don't get all the posts from the blogs I follow on my sidebar?? I have so many wonderful followers that I want to keep up with and only get a few of the ones I follow regularly. I have checked and most of them post all of the time and I never know!
I tried to look in my account to set it up differently or something but can't seem to figure out what to do...I follow all publicly and remember initially setting up the account that I had the option of putting it on my sidebar but now I don't know where to go to make the changes. Help!!!!
To any of you out there that I don't comment on your posts please don't feel as if I don't care...I love to follow all of you and see what you're up to. It's the way I start my morning each day and look forward to it. Any advice would be helpful!
Busy, busy week ahead...
Two swaps to complete by Friday, my part to the tutorial with Tammy for cross stitching, still finishing up that bedroom redo and have to start putting together our "Meet the Team" picnic for our son's high school football team that we chair every year.
Wish I didn't have to sleep....how great would that be??
Think I finally got the picture resizing figured out for my pattern covers too and hope to have them all online & listed for sale by the end of the week.....THAT will be a HAPPY update!!
Hope you all have a great beginning to your week!
~Kriss~

Sunday, July 10, 2011

~*Henna Tattoo Flop*~

Okay...not the results I was looking for. I am convinced that I will need to use some kind of a different applicator. The design lines on my foot are the perfect width but the design is too light and the design on my wrist is the perfect color but too thick, I need to figure out the in between.
I also need to figure out a way to get the design drawn on paper and transfer it to my skin first like when you get a regular tattoo...I can freehand designs pretty well but it was really hard to get that control with a bottle or paintbrush and keep it even, kinda looks like a little kid did it and I am WAY more artistic than that LOL!!
I took a couple of pics & had hubby take some so you can see the finished designs but I'll be living with a bit of a mess until it all washes off  :o) The average life of a henna tattoo is 7-14 days depending on location and care. My foot should be gone soon and as I mentioned before I am a chronic hand washer to I'll be sure to include my wrist each time to speed it up.
I'm not giving up though...I WILL get this figured out and have fun with some designs until I can get myself another real tattoo....my next being and angel on my left shoulder in memory of my mom.
Earlene posted concerns over safety...you're a sweetheart! Henna is absolutely safe. It is a natural dye powder mixed with water & ucalyptis oil that just stains the top layer of the skin. The only danger is irritation if you have sensitive skin.
So here are the final results.....
 So light you can't hardly see it.
 The color is great but looks like a kid did it!!
 The ink spreads a little as it dries and makes the finished design a little bigger...another thing to remember.
Oh well...it was a fun and interesting experience. I'll be on the lookout for supplies I can use to do it with more precision next time!!
Have a happy Sunday   ~Kriss~

Saturday, July 9, 2011

*~Phase One Henna Tattoo*~

Uh Oh, don't think this is going as planned. I read the directions, spent hours looking at designs on a site that offered "free tattoo designs" only to find out in the end it's free to look but you can't print out the designs without paying top dollar so then I spent another hour or so drawing out my own designs deciding on butterflies and vines for their simplicity in drawing out on my own.
The henna kit came with a squeeze bottle applicator but it comes out so thick that I decided to use a fine paintbrush instead when I started the design on my foot. Didn't think it went on thick enough so I decided I must have to use the applicator and the thickness must be necessary but now I have a globby mess on my wrist.....I'll post pics when it's all done but I honestly think this isn't going to be what I had in mind LOL.  I have no control over the detail that I wanted.


 These could work..............

 Okay, this doesn't look ANYTHING like the design I put on paper!!  LOL
 Globby & Goopy
 At this point I don't even know what the heck to do with this thick glop....Can you tell I have OCD and wash my hands probably 100 times a day, couldn't use any lotion prior to application though.
Not the delicate lacey floral design I had in mind!!

I got some emails from some of you for info so keep an eye on here for the final pictures & results. We'll learn this together!!        ~Kriss~

Friday, July 8, 2011

~*Suprise Visit With A Friend & The Search For Henna*~

TGIF!! It was actually a pretty fast week with having Monday off, can't believe it's already Friday.
Had a nice last minute visit with my sweet friend last night, aren't those unexpected times the best?? She's leaving to go out of town for her niece's wedding and needed a haircut so I went and got her and brought her here....had so much fun together!!
We haven't had the chance to visit in awhile so it was wonderful to just sit on the porch and talk & talk & talk....She's like a second mom to my youngest son and he was happy to spend a little time visiting too. We've decided that we are having a girl's night soon! I am planning a Saturday night in the next few weeks to have some of my best girls over!! Sweatpants, wine,snacks & maybe a good sappy movie.
It was great to have uninterrupted time together...no sidetracking :o) Although we talk nearly every day there's something so much nicer about being together. She went home with a pretty new haircut, a tummy full of leftover pasta & cupcakes and I got the best part ~ to share it all with her!
This weekend I think we're also finally going to be able to get together with some of our other friends that we  haven't been able to see in awhile. Their daughter plays on a traveling softball team and every weekend is usually taken up. We're hoping for a cookout & bonfire....keeping my fingers crossed!! Same thing with her, we talk on the phone all the time but I really miss seeing her!
I was supposed to be with another one of my friends today for her neighborhood yard sale. About a month ago she let me know about it and we were going to do it but she decided at the last minute she didn't want to. I was looking forward to spending the time together as it seems like every time I try to make plans with her it falls through and I was really hoping it would work out this time. Bummer!! I've been getting things ready for the past week and 1/2  for the sale so I think my hubby & I will go to the flea market to sell it this Sunday. My friend that was here last night was originally going to go with me but she's leaving for the wedding early Sunday morning now. I have way too much time invested in sorting & pricing stuff & really need the $ so I hope it doesn't rain!! My husband actually enjoys the flea market so I think it will end up being fun.

Sooooo......I have a mission today. I am on the search for a Henna Tattoo Kit!! I've always wanted to try it and I saw one at Michael's a few weeks ago. Hoping they still have it. I have my 40% off coupon ready to go. I'm planning on a floral band on my left wrist, a little design on the top of my right foot and something small around my belly ring....yep you heard me right LOL Let me say that I had it done 14 years ago. My hubby was getting a tattoo and while I was waiting for him I decided I would do it as he loved the way it looked. Let me also say that it HURT!!!!
This was before every girl you see had a belly piercing so I was embarrassed that I had it...it wasn't the "norm". It ended up getting infected and I had to go to my doctor & was humiliated LOL. I certainly don't show it as I don't have one of those nice little tummies but I keep it for my hubby.....the things we do for love!!
I'm adding a link to a great henna site I found if you are curious....hope I can find it!!
Hope you all have a great Friday!!   ~Kriss~

http://www.hennabyheather.com/free_patterns_mehndi.html

Thursday, July 7, 2011

BitterSweetAndPrim: I think its time for a GIVEAWAY

BitterSweetAndPrim: I think its time for a GIVEAWAY: " Well Hello to ALL my followers, I have been crazy busy and I have been having problems making post, it would not allow me to save anythin..."

Wednesday, July 6, 2011

~*A Tiny Visitor*~

Look who was waiting outside for me when I took my coffee out on the front porch.
Life is truly full of small blessings if we stop and take the time to appreciate them. Be safe & well little one.....


~*Rusty Thimble Giveaway*~

Good morning to everyone, hope you all enjoyed your 4th!

Wanted to pass along a great giveaway by Brenda at The Rusty Thimble. She's giving away this wonderful witch...very sweet!! You have until July 14th to enter and she will draw the winner on her birthday (also my son's!) July 15th....be sure to enter & take a chance!!

Lot's to do today. My Aunt is here form North Carolina and is coming for dinner tonight. It's been YEARS since I've seen her & I'm so excited! Making a big pan of lasagna for dinner, still not sure about dessert....going to food network after I get done here and peak at what Paula Deen has for recipes.

It's supposed to be hot here today, my air conditioning still isn't hooked up so I hope to get my cleaning/food prep done early before the heat truly hits. Still working away on my bedroom, have the bedding almost finished, got the curtain for the fireplace sewn, table & fireplace mantle are painted. Pictures soon!!

Hope you all have a wonderful Wednesday!   ~Kriss~

Monday, July 4, 2011

~** Happy 4th Of July **~

Hope you all have a wonderful day planned. We're heading off to the beach for a day of sun, sand & waves. It's not often the four of us all have the same day off together so I'm looking forward to some time together!
Friends might go with us, still waiting for their daughter's softball schedule. If they go it will give her and I time to catch up and have some girl talk, sounds wonderful!! If they can't I'm hoping that book stores are open today because I'm on the hunt for a magazine my mom used to get called "True Story". Wonder if it's still published?? I grew up with that magazine coming every month. My mom was an avid reader & always had a book going...it's how she spent her first quiet moments of the morning...a cup of coffee in one hand and her book in the other.
The magazine was a collection of short love stories, hoping they still have it! I'd be more than happy to lose myself in sappy love stories for a couple of hours  :o)
 Packing up some turkey, bacon,cheddar, leaf lettuce & tomato sandwiches, chips, watermelon, grape & strawberry salad, cucumber spears & dip and I'm cheating with some store bought cookies!! Wish I could take my coffee pot to the beach....I'll have to make due with iced tea! My plan is little cooking...no cleaning!!
We went to see fireworks last night. There's a wonderful 50's themed diner-ice cream place by the beach where we park to watch the show put on by our local amusement park. Ice cream & fireworks on a warm summer night, what says summer more than that?
Took a few quick pictures of some of my garden displays. My home is very neutral in color inside, I love beiges, browns & blacks, but outside I love to use splashes of red and carry an Americana theme.


Bench display on the end of my front porch. Check out the Bee Skeps...I made these this weekend, they are so expensive but I've always wanted some for my garden so I plotted, planned & here they are! I'll be sharing these in pattern/direction form in the future for you!
Side door display. This door will be painted the same barn red as my front door. These steps are in desperate need of painting!! The flag on the ladder was my husbands parents, he found it in the attic...old & worn just the way we like it!!

Very simple display on a small table on my back deck, I want to add some white daisies to the jar with the flags.

Bench display on my back deck. I have collected a few of these blue mason jars and although I love them I just didn't like them in my kitchen. I decided to use them outside and really like the way they are pulling things together......I have a few "rustic primitive" pieces like this tray too that I've decided to bring outdoors. The inside of my house is more of a colonial feel but I didn't want to give up any of these things and have found that I love the way they work outside. I found the coolest solar lids for these jars but am waitinf for a sale as they are WAY too expensive.

This still needs something in the right front corner, thinking a trailing ivy plant in a terra cotta pot.
 I have the cutest display I'm working on that I'll be using next to my pool, I found a picture of a prairie dress that someone used as a "scarecrow" in their flowerbed...cute!! I painted a birdhouse I already had the red that is the color of my front door & am going to wrap grapevine around the pole. the dress will go next to it and I'm going to plant some white shasta daisies, blue salvia and hosta in the bed underneath & accent with a small bench & potted plants.....I'll post when it's finished!!

I'd like to extend a big Thank You to all the men and women who have dedicated their lives to our country. We have the freedom and blessings of this country because of them. Wish they could all  spend the day with their families and friends as we will....their sacrifice is our safety. God bless them all past, present & future!!

Enjoy your day...indulge in too much picnic food, some fireworks & hopefully a little relaxation!!
  ~Kriss~